
Generate summary with AI

Your Windows computer keeps secrets. Hidden beneath the familiar folders and files you see every day lies an entire ecosystem of configuration files, system data, and application settings that Windows deliberately keeps out of sight. But what happens when you need to access these hidden files for troubleshooting, cleanup, or security investigations?
Not knowing how to reveal hidden files leaves you flying blind. You try to diagnose why your laptop is running slowly, but you can’t see the temporary files cluttering your AppData folder. Or attempting to remove malware hiding in protected system directories you didn’t even know existed. For MSPs and IT professionals managing multiple endpoints, reliable access to hidden files becomes critical for system maintenance, security audits, and emergency troubleshooting.
Here’s everything you need to know about viewing, managing, and safely working with hidden files in Windows 11, from basic File Explorer toggles to advanced PowerShell commands and enterprise-grade third-party tools.
Why Windows 11 hides files and folders
Before learning how to reveal these hidden files and folders, you should understand exactly why Windows hides them in the first place. Just like earlier Windows versions, the Windows 11 OS has certain files and folders that are hidden by default (usually system configuration files and some application data files).
Some hidden files can be modified freely without any serious effect on the system functions, but most could destabilize a function or the operating system when modified or deleted. They include:
Operating system files
These are critical files that are needed for the operating system to boot and function properly. For example:
- The Recovery folder: This contains system restore points and recovery tools, and deleting it would eliminate your ability to restore Windows if something goes wrong, forcing a complete reinstallation.
- $Recycle.Bin: This manages deleted files, and removing it prevents the Recycle Bin from working properly, making file recovery impossible and potentially causing File Explorer crashes.
Application data and user-specific files
These store settings, preferences, and cached data for installed programs. The AppData folder contains three subfolders:
- Local (temporary files and caches)
- LocalLow (restricted access data)
- Roaming (settings that sync across devices)
Accidentally deleting Chrome’s AppData folder would wipe all bookmarks, saved passwords, and extensions, essentially resetting the browser to factory defaults. Similarly, removing Outlook’s data files would delete all emails, contacts, and calendar entries stored locally.
Regular hidden files
These maintain system organization without being critical to operations. The desktop.ini file controls how folders appear in File Explorer, including custom icons and layouts, and deleting them typically just resets folder customizations to default appearance.
Removing hidden personal files could result in permanent data loss if you don’t have backups, since these files bypass the Recycle Bin when deleted through command line operations.
Who can view hidden files in Windows 11?
Not everyone can access all hidden files in Windows 11. Your ability to view and modify these files depends on three key factors:
1. User account limitations
Standard users can reveal regular hidden files through File Explorer options without any issues. However, accessing advanced File Explorer settings to show protected operating system files requires administrator privileges. This built-in restriction prevents everyday users from accidentally exposing critical system files.
2. Permission-based restrictions
Even with the right account type, NTFS file permissions can block access. If a user account is denied “list folder contents” or “read” permissions on specific directories, those hidden files remain inaccessible regardless of visibility settings. This becomes particularly relevant in enterprise environments where IT administrators need granular control over file access.
3. Enterprise policy controls
Organizations managing remote workstations often use Group Policy to restrict access to hidden files and folders. This approach works especially well for deployment folders containing applications and essential scripts that end users shouldn’t modify. Advanced administrators can also edit registry keys, setting the “NoFolderOptions” value to 1 or 0 in <HKEY_CURRENT_USER\SOFTWARE\Microsoft\Windows\CurrentVersion\Policies\Explorer> to completely prevent or enable access to Folder Options.
» Here’s how to open Local Group Policy Editor
Easiest methods to show hidden files in Windows 11
Windows uses two distinct methods to categorize these hidden files and the technical level:
- Regular hidden files have only the “hidden” attribute
- Protected operating system files carry both “hidden” and “system” attributes
This dual-layer approach is reflected in File Explorer’s visibility options: checking “Show hidden files” reveals the first category, but accessing protected system files requires the additional step of unchecking “Hide protected operating system files” in advanced settings.
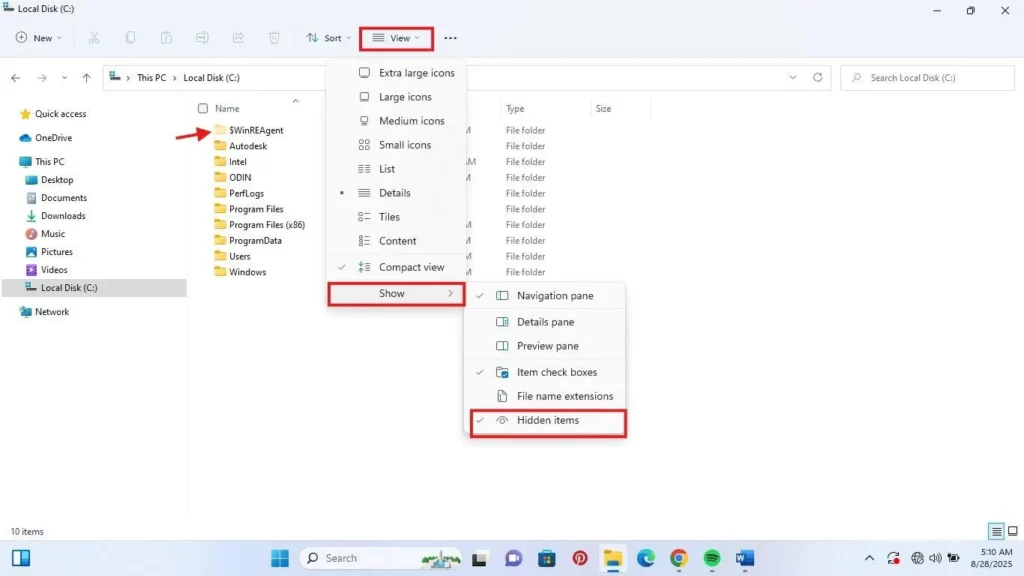
Method 1: File Explorer
- Open File Explorer or use the shortcut (Win + E)
- On the toolbar, click View
- Click on Show
- Then select Hidden items
Hidden files and folders should immediately appear with faded icons.
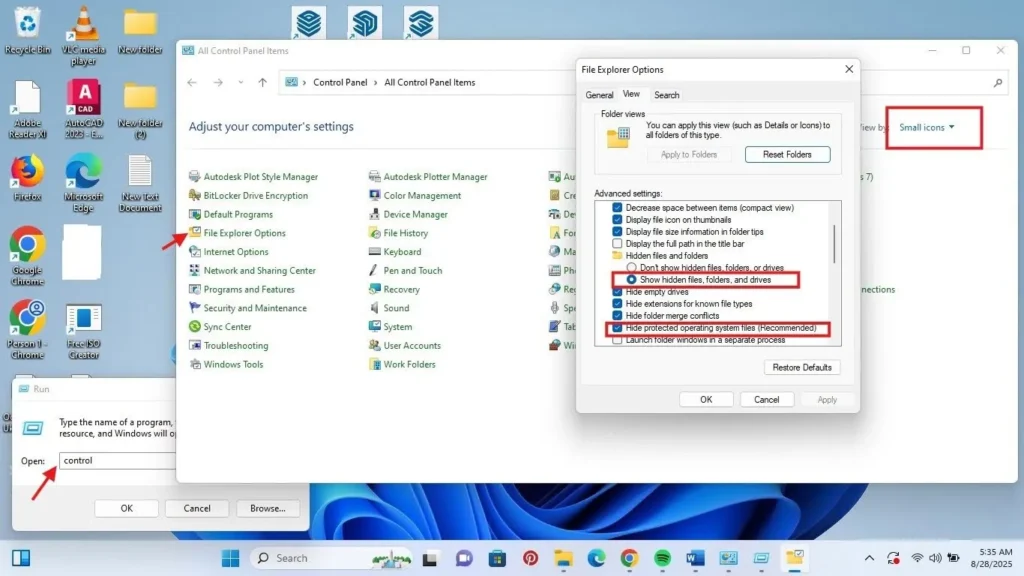
Method 2: Control Panel
To access the control panel, you can type “control panel” on the Start menu Search box or Press Win + R , then type “control” and press enter. Then follow these steps:
- On the Control Panel window, go to view by and select either Small icons or Large icons to have more options
- Then locate and click on File explorer options
- Click the View tab
- Select “Show hidden files, folders, and drives” to view only hidden files
- To see protected operating system files, uncheck the box “Hide protected operating system files”
- Click “Apply” and “OK”
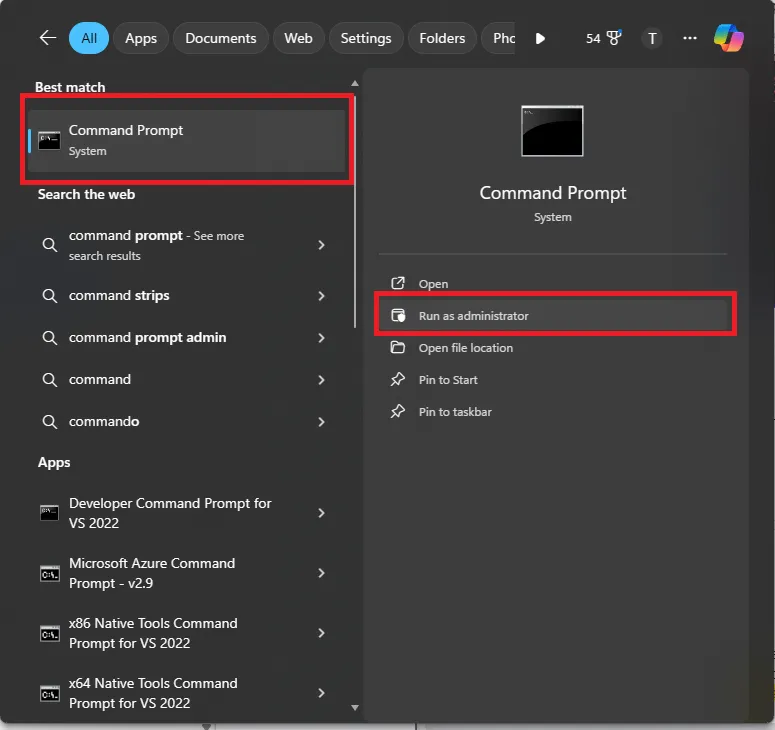
Method 3: Command Prompt
To use this, you have to know the directory part of the folder where you want to remove the hidden attribute, then start the Command Prompt interface as an Administrator.
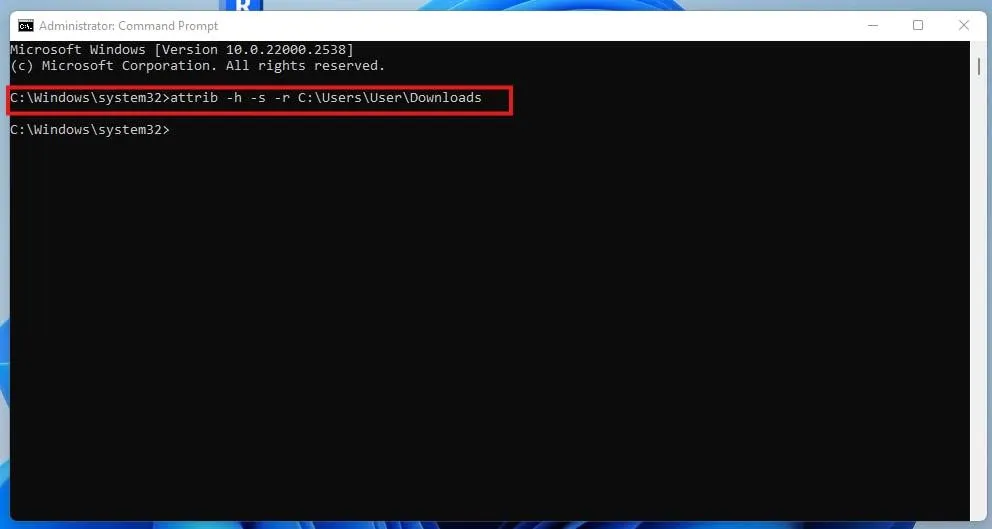
Then follow these steps:
- Enter the command type <attrib -h -r -s /s /d “filename or foldername”>
- For example, the directory path “C:\Users\YourUsername\downloads”
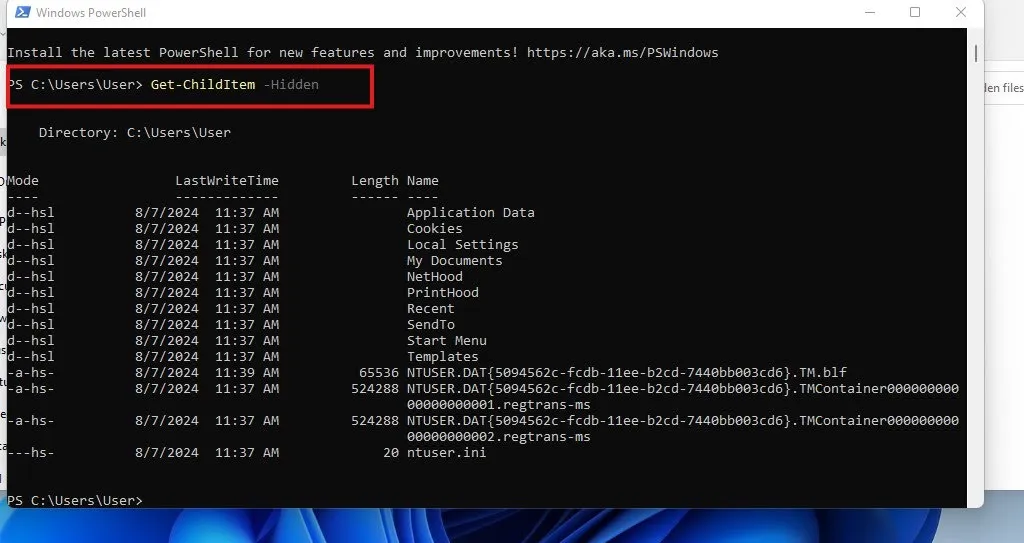
Method 4: PowerShell
PowerShell offers more flexibility than File Explorer for discovering and managing hidden files, especially in enterprise IT environments where automation becomes critical.
Open PowerShell by pressing Win + R, typing “powershell”, and pressing enter. Then type <Get-ChildItem -Hidden>. For example, Get-ChildItem -Path “C:\Folder\Path” will retrieve only files and folders marked with the Hidden attribute.
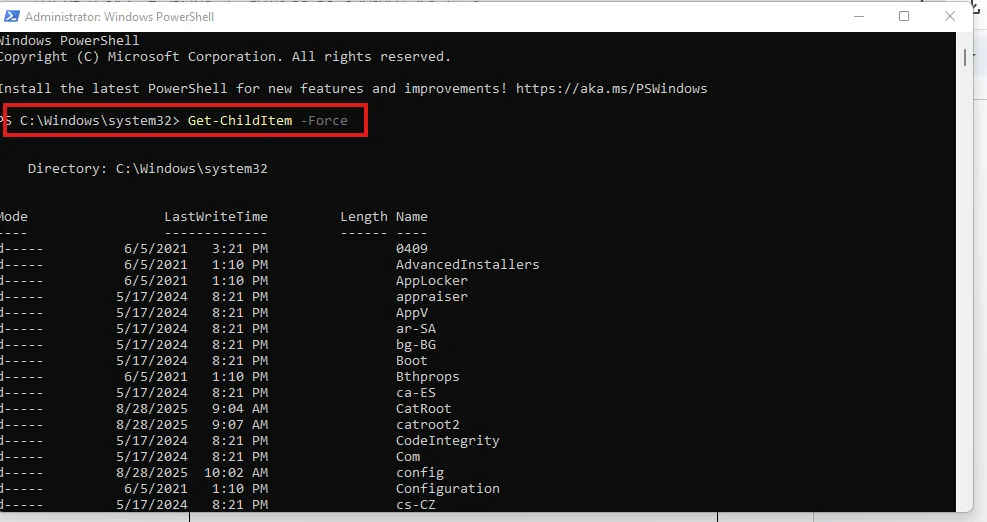
Additionally, the <Get-ChildItem -Path “C:\Folder\Path” -Force> command overrides default filters to show both hidden and system-protected files, providing complete visibility into all concealed content.
» Did you know you can paste in PowerShell?
For MSPs and IT teams managing multiple endpoints, Atera’s remote PowerShell execution capabilities transform these commands into scalable solutions. Rather than manually connecting to each device, administrators can generate custom hidden file discovery PowerShell scripts tailored to specific scenarios from natural language queries with AI Copilot and deploy them across entire client networks from Atera’s centralized RMM console. Effective on the small scale, but monumental when it’s hundreds of devices you’re working with.
» Learn more about enterprise IT management
Troubleshooting: What if you can’t view hidden files?
When standard methods fail to reveal hidden files, the issue often stems from corrupted system files, malware interference, or restrictive policies. Here’s a systematic approach to diagnose and resolve visibility problems.
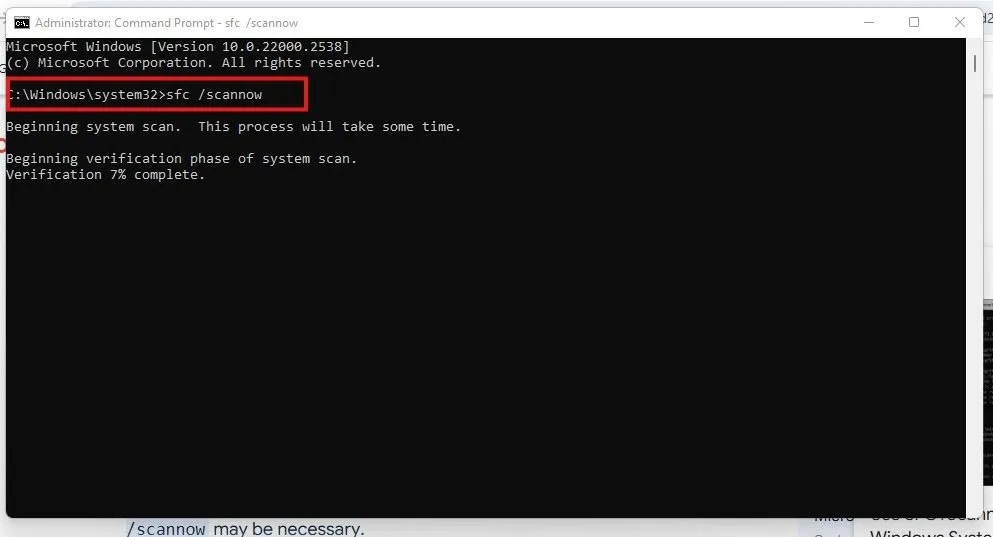
Step 1: Verify and repair system integrity
Corrupted Windows system files can prevent proper file visibility settings from taking effect. Run System File Checker to scan for and repair damaged components:
- Press Win + S and type “cmd”
- Right-click Command Prompt and choose “Run as administrator“
- Enter <sfc /scannow> and press Enter
- Allow the scan to complete (this may take 15-30 minutes)
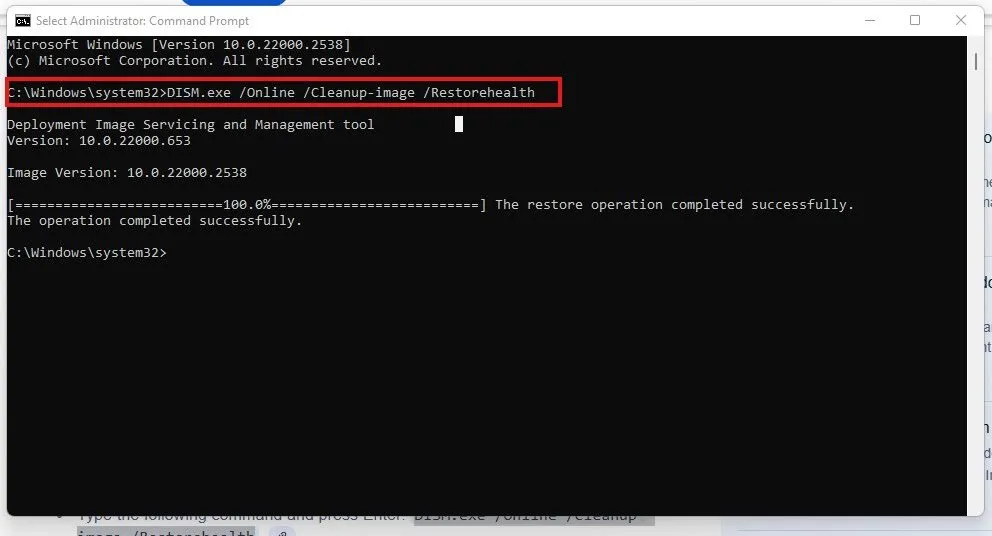
If SFC finds issues it cannot repair, follow up with the Deployment Image Servicing and Management tool:
- In the same elevated Command Prompt, enter DISM.exe /Online /Cleanup-image /Restorehealth
- Wait for the process to complete
- Restart your computer and test hidden file visibility again
Step 2: Check registry settings
Malware or system corruption can modify registry keys that control file visibility. Navigate to the registry editor with caution:
- Press Win + R, type “regedit” and press Enter
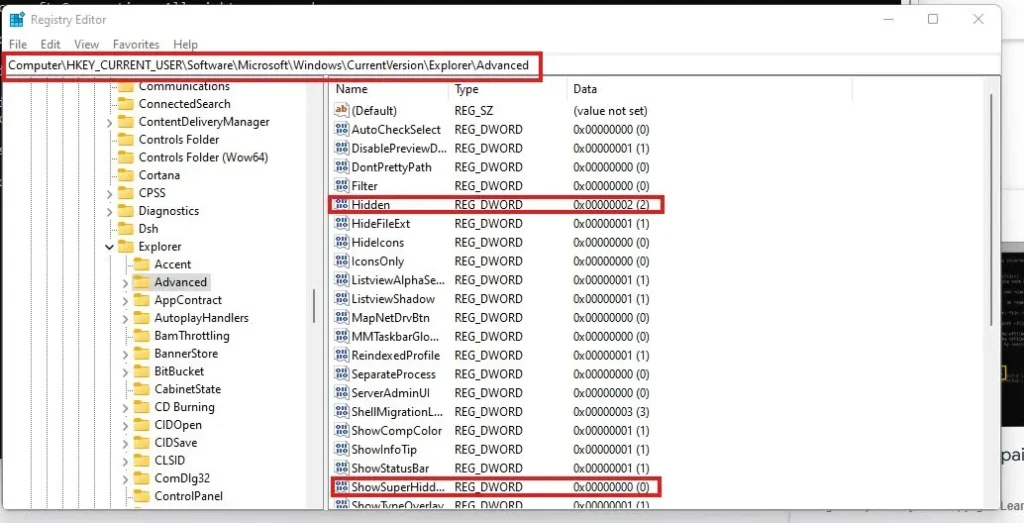
- Navigate to HKEY_CURRENT_USER\Software\Microsoft\Windows\CurrentVersion\Explorer\Advanced
- Look for the “Hidden” DWORD value; it should be set to “1” to show hidden files
- Check “ShowSuperHidden” DWORD value; set to “1” to show protected operating system files
If these values are missing or incorrect, right-click in the right pane, select “New” > “DWORD (32-bit) Value” and create them with the proper values.
» Don’t miss our top registry editor challenges & solutions
Step 3: Reset File Explorer to defaults
Sometimes File Explorer settings become corrupted beyond simple registry fixes:
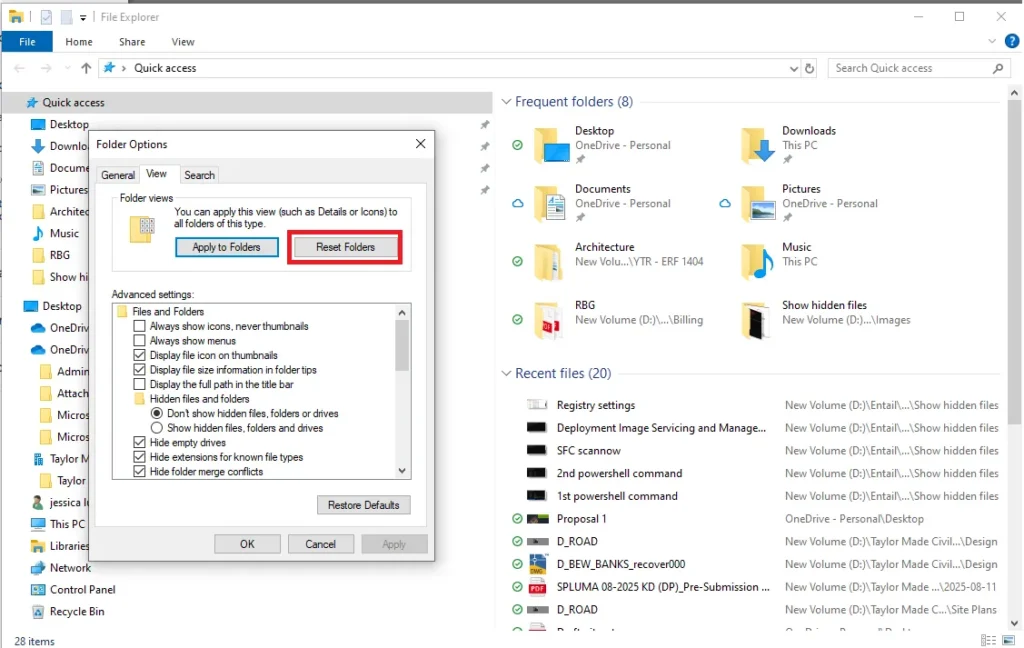
- Open File Explorer and click the View tab
- Click “Options” then “Change folder and search options“
- In the Folder Options dialog, click “Reset Folders” to restore default view settings
- Click “Apply” and test visibility settings again
» Still got problems? Consider running a Windows PC diagnostics report
Simplify hidden file management in Windows 11
Mastering hidden file visibility in Windows 11 requires understanding the three distinct categories of concealed content, from safely modifiable regular hidden files to critical protected system files that can destabilize your entire operating system. Whether you’re using File Explorer’s basic toggles or PowerShell commands for automation, don’t forget to implement proper safeguards like system restore points and permission controls.
For MSPs and IT teams managing complex infrastructures across multiple clients, individual endpoint management becomes unsustainable at scale. Atera’s Agentic AI platform streamlines these processes through centralized remote PowerShell execution via RMM, while AI Copilot generates custom scripts for technicians and Robin autonomously handles routine end-user requests across hundreds of managed devices.
» Interested? Start a free trial with Atera
Frequently Asked Questions
Related Articles

What is IT Management
IT downtime costs thousands of dollars per minute, yet most companies don't realize they have a management problem until systems fail. Without structured IT management, you face productivity hemorrhage, security breaches from unpatched vulnerabilities, and technical debt that consumes IT budgets. Technology should be a business enabler, not a constant crisis.
Read now
What is infrastructure monitoring?
The difference between proactive IT and midnight firefighting comes down to visibility: seeing CPU saturation before it crashes services, catching disk failures before they lose data, and detecting anomalies hours before they become disasters. Effective infrastructure monitoring is the path that gets you there.
Read now
CapEx vs. OpEx
Misclassifying IT spending as CapEx or OpEx inflates profits short-term but distorts financial reporting, tax liability, and strategic decisions. Bad enough, this could be extremely costly and time-consuming to fix. Getting it right determines whether your IT investments align with cash flow, growth trajectory, and compliance requirements.
Read now
How to restart a remote computer using Windows
Remote Windows restarts fail when network connectivity drops, permissions aren't configured correctly, or firewall rules block critical services. This guide covers every method (from Command Prompt and PowerShell to enterprise tools like Intune and SCCM) plus backup strategies for when systems freeze or disconnect from the domain.
Read nowEndless IT possibilities
Boost your productivity with Atera’s intuitive, centralized all-in-one platform


