
Table of contents
Generate summary with AI

Not knowing where to find your Windows PC’s serial number might set you up for future headaches. Imagine being in the middle of a critical warranty claim, compliance audit, or asset inventory when you realize the chassis sticker is completely worn off. You try to remember which command retrieves the serial number, but because you haven’t needed it in months, you’re left scrambling through BIOS screens and manufacturer utilities, hoping one of them actually works.
Knowing multiple methods to retrieve Windows PC serial numbers (both locally and remotely) can streamline asset management, improve incident response, and ensure compliance across Windows devices, even in complex enterprise environments.
This guide covers the practical methods for finding Windows PC serial numbers, from lightning-fast command line queries to PowerShell scripts that can poll entire networks, so you’ll never be caught without this critical piece of hardware information again.
Why you need your Windows PC serial number
Your PC’s serial number serves as its unique fingerprint in the digital world, and there are several scenarios where having it readily available can save you significant time and frustration:
- Asset lifecycle management and compliance: IT teams rely on serial numbers for accurate inventory tracking, especially in environments with mixed-brand devices. During compliance audits, regulators often require precise hardware identification to verify software licensing, security patches, and configuration management.
- Warranty claims and technical support: When hardware fails, manufacturers use serial numbers to verify warranty coverage, determine eligible repairs, and access device-specific support documentation. Attempting to process a warranty claim without the serial number often means lengthy phone calls with support representatives or physically accessing devices that might be installed in hard-to-reach locations.
- Security and incident response: During security incidents, serial numbers help IT teams quickly identify affected devices, track hardware movements, and correlate security events with specific endpoints. This becomes particularly critical when investigating data breaches or unauthorized access attempts across large networks.
- Remote device management: For organizations managing distributed workforces, serial numbers enable remote IT support and identification of devices without requiring end users to physically inspect their hardware. This streamlines everything from software deployment to hardware refresh planning.
» See our picks for the top free IT asset inventory management software
Simplest methods for locating your serial number on Windows devices
Method 1: via command prompt
Using Command Prompt is one of the most direct ways to retrieve a PC’s serial number. This method works across Windows 10 and Windows 11, and doesn’t require admin rights unless system restrictions are in place.
Follow these steps:
1. Press Windows + R, type cmd, and hit Enter

2. In the Command Prompt window, type <wmic bios get serialnumber>

3. Press Enter
4. You’ll see:
SerialNumber
ABC123XYZ
The common outputs you’ll see include:
- Valid serial (e.g., “ABC123XYZ”): Pulled from BIOS, typically accurate.
- “To be filled by OEM”: Manufacturer didn’t embed a serial in BIOS; common in custom-built PCs.
- “None” or blank: BIOS lacks serial data; may occur in virtual machines or improperly configured systems.
Method 2: with PowerShell
PowerShell is a powerful tool for retrieving serial numbers, especially when managing multiple devices across an enterprise. Here’s how to do it step by step:
1. Press Windows + R, type “powershell”, and hit Enter

2. Run: <Get-WmiObject Win32_BIOS | Select-Object SerialNumber>

» Did you know you can paste in PowerShell?
For remote machines (via script)
This method reads a CSV file and queries each computer listed, returning both the computer name and its serial number. It only works if you have administrative access to the remote computers and they’re on the same network domain.
Step 1: Enable remote access (one-time setup)
Before you can query remote computers, you need to enable WinRM on each target machine. On each remote PC, run this command as an administrator: <winrm quickconfig>

This allows your computer to connect to and run commands on the remote machines.
Step 2: Query specific computers directly
To check serial numbers on specific remote computers through PowerShell, use:
<Get-CimInstance -ClassName Win32_BIOS -ComputerName “PC001″,”PC002” | Select-Object PSComputerName, SerialNumber>
Replace “PC001” and “PC002” with the actual computer names on your network. You can add more computers by separating them with commas.

Step 3: Query multiple computers from a list (optional)
For larger deployments, create a CSV file called computers.csv with this format:
ComputerName PC001 PC002 PC003
Then run this PowerShell script:
powershellImport-Csv C:\computers.csv | ForEach-Object { Get-CimInstance Win32_BIOS -ComputerName $_.ComputerName | Select-Object PSComputerName, SerialNumber }

» Learn more: How to run PowerShell commands on a remote computer
Method 3: looking inside BIOS/UEFI
Accessing BIOS/UEFI is often more reliable than OS-based methods, especially when Windows tools return “To be filled by OEM” or blank. BIOS pulls data directly from firmware, which bypasses OS limitations.
Follow these steps:
1. Click Start > Settings > Windows Update > Advanced options > Recovery

2. Under “Advanced startup,” click Restart now

3. Click Troubleshoot

4. Click Advanced options

5. Click UEFI Firmware Settings
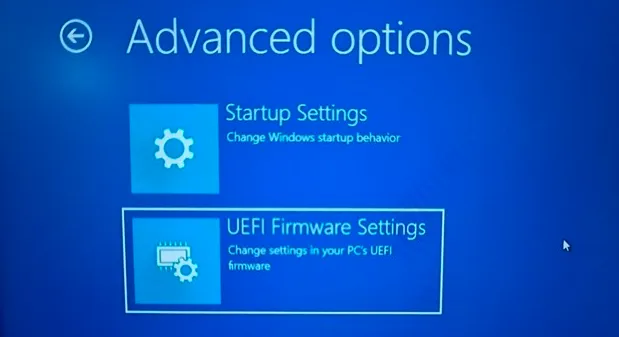
6. Click Restart

7. Once inside BIOS/UEFI, navigate to the Main, System Info, or Product Information tab. This will be different on almost every motherboard manufacturer
8. Look for “Serial Number” or “Service Tag”
» Here’s how to manually re-enable Windows automatic updates and update BIOS
Troubleshooting: What if serial numbers aren’t accessible?
Several scenarios can prevent you from retrieving a PC’s serial number through software methods. For example, some scenarios where serial numbers are unavailable include:
- Custom-built or white-label PCs often lack BIOS-embedded serials, returning “To be filled by OEM” or blank values in tools like wmic or PowerShell. This happens because smaller manufacturers don’t always program unique identifiers into the BIOS during assembly.
- Virtual machines may generate placeholder serials or none at all, depending on hypervisor settings. VMs typically rely on Universally Unique Identifiers (UUIDs) or MAC addresses instead of traditional hardware serials.
- Refurbished or reimaged devices sometimes have BIOS data wiped or overwritten during servicing, leaving gaps in the serial number fields.
Alternative methods when software fails
When the standard approaches fail, there are still some steps you can take to try and find your serial number:
- Check the physical label: Usually found on the bottom, back, or inside battery compartments on laptops or the motherboard on desktops. Even when software methods fail, the original manufacturer sticker often remains intact.
- Use manufacturer utilities: Tools like Lenovo Vantage, HP Support Assistant, or Dell SupportAssist can sometimes retrieve serials even when other methods return blanks. These utilities pull data from both firmware and manufacturer databases.
The challenge with manufacturer inconsistencies
OEMs vary widely in how they assign and expose serial numbers:
- Dell often uses alphanumeric service tags placed visibly on the chassis
- Lenovo may embed serials in BIOS and print them beneath the battery
- HP sometimes includes multiple identifiers (serial, product, and asset tags) on the same label, which can confuse inventory teams
These inconsistencies affect IT asset tracking by introducing risks of duplication, misidentification, or unreadable data during audits.
Formatting inconsistencies across manufacturers
Serial number formatting across brands is notoriously inconsistent:
- Some use 10-digit numeric codes, others mix letters and symbols
- Placement varies from BIOS to hidden stickers
- During enterprise audits, duplicate serials have been found across different vendors
- Manufacturers like Lenovo and niche OEMs both use identical placeholder values like “1234567890” for unrelated devices
This inconsistency complicates automated inventory systems, particularly when integrating with platforms such as CMDBs or RMM tools.
Virtual machines and custom builds
VMs and custom-built hardware present additional complications:
- VMs often lack standardized serial numbers, relying instead on UUIDs or MAC addresses
- These identifiers can be cloned or regenerated, leading to inventory mismatches
- In VMware environments, cloned VMs frequently share identical serials, disrupting patch deployment
- Custom-built PCs may omit BIOS-embedded serials entirely, returning “To be filled by OEM”
For large environments, these IT challenges make standardizing asset tags or utilizing AI Copilot discovery crucial to prevent costly tracking errors across physical and virtual infrastructure.
Streamlining serial number management with Autonomous IT
Finding Windows PC serial numbers doesn’t have to be a manual hunt through command prompts and BIOS screens. While the methods outlined in this guide work for individual devices or small deployments, they become time-consuming bottlenecks when managing enterprise fleets with mixed manufacturers, virtual environments, and remote workers. The core challenge isn’t just retrieving serial numbers; it’s the inconsistency across OEMs, the placeholder values in custom builds, and the duplicate identifiers that plague virtualized environments.
Atera’s AI Copilot transforms this reactive process into proactive asset intelligence. Instead of running individual commands across hundreds of devices, the platform automatically discovers, correlates, and standardizes hardware identifiers; even when traditional serial numbers are missing or inconsistent. Atera’s unified dashboard eliminates the gap between device discovery and asset management, ensuring your hardware inventory stays accurate without the overhead of manual verification processes.
» Interested? Start a free trial with Atera
Frequently Asked Questions
Related Articles

What is IT Management
IT downtime costs thousands of dollars per minute, yet most companies don't realize they have a management problem until systems fail. Without structured IT management, you face productivity hemorrhage, security breaches from unpatched vulnerabilities, and technical debt that consumes IT budgets. Technology should be a business enabler, not a constant crisis.
Read now
What is infrastructure monitoring?
The difference between proactive IT and midnight firefighting comes down to visibility: seeing CPU saturation before it crashes services, catching disk failures before they lose data, and detecting anomalies hours before they become disasters. Effective infrastructure monitoring is the path that gets you there.
Read now
CapEx vs. OpEx
Misclassifying IT spending as CapEx or OpEx inflates profits short-term but distorts financial reporting, tax liability, and strategic decisions. Bad enough, this could be extremely costly and time-consuming to fix. Getting it right determines whether your IT investments align with cash flow, growth trajectory, and compliance requirements.
Read now
How to restart a remote computer using Windows
Remote Windows restarts fail when network connectivity drops, permissions aren't configured correctly, or firewall rules block critical services. This guide covers every method (from Command Prompt and PowerShell to enterprise tools like Intune and SCCM) plus backup strategies for when systems freeze or disconnect from the domain.
Read nowEndless IT possibilities
Boost your productivity with Atera’s intuitive, centralized all-in-one platform


