
Generate summary with AI

Organizations waste an average of 70% of physical server capacity running single applications on dedicated hardware. The average rate of server utilization is only 12 to 18%. This inefficiency drives up power costs, requires excessive data center space, and makes disaster recovery complex and expensive, but it doesn’t have to be this way. Virtualization solves these problems by allowing multiple workloads to run on shared hardware. The new problem is that choosing the wrong hypervisor platform can introduce new challenges through licensing costs, compatibility limitations, and management complexity.
Microsoft Hyper-V addresses these inefficiencies with a Type 1 hypervisor that’s included free with Windows Server and Windows 10/11 Pro editions, eliminating the licensing fees that competitors like VMware ESXi charge. This guide walks you through everything you need to deploy and manage Hyper-V effectively.
Why modern IT needs efficient virtualization
By abstracting workloads from physical hardware, virtualization allows IT teams to quickly spin up, move, or scale environments without purchasing and configuring new servers.
The reasons it needs to be efficient include:
- Resource optimization: Virtualization lets multiple virtual machines (VMs) share a single physical server, so an efficient tool helps you maximize CPU, memory, and storage utilization instead of leaving resources idle or consuming more than the hardware can actually handle. Efficient virtualization increases utilization rates to 80% or higher by consolidating resources.
- Speed and flexibility: IT departments can rapidly deploy testing, development, or production environments, clone existing setups, and recover from failures faster, all with less manual intervention.
- Security and compliance: Virtualization allows for isolated test environments, network segmentation through virtual switches, easier application of security policies, and improved information security, which are essential for compliance in sectors like finance and healthcare.
- Scalability: Businesses can scale services up or down quickly by reallocating resources to VMs, meeting changing demands without long procurement cycles.
- Disaster recovery: Efficient virtualization simplifies backup, replication, and failover, reducing downtime during disasters and supporting business continuity strategies and rapid recovery in case of hardware failure, cyberattacks, or data loss.
What is Microsoft Hyper-V?
Microsoft Hyper-V is a Type 1 hypervisor built into Windows Server and Windows 10/11 that enables efficient virtualization by running directly on hardware. Compared to VMware ESXi and Oracle VirtualBox, Hyper-V offers native integration with Windows environments and Microsoft services as Active Directory, Azure Site Recovery, and Windows Defender Credential Guard to enable centralized identity, backup, and security management.
Microsoft Hyper-V is a bare-metal hypervisor that allows multiple virtual machines (VMs) to run on a single physical host. Unlike Oracle VirtualBox, which is a Type 2 hypervisor running atop an OS, Hyper-V and VMware ESXi are Type 1 hypervisors offering direct hardware access for better performance.
Its robust scalability and cost-effective licensing make it ideal for MSPs and enterprise IT management, and its architecture is built on partitioning, virtual switches, and resource allocation:
- Partitioning: The hypervisor creates isolated partitions. The parent partition runs Windows and manages child partitions (VMs).
- Virtual switches: Hyper-V uses Extensible Virtual Switches to route traffic between VMs and external networks, supporting VLANs and SR-IOV for high-performance networking.
- Resource allocation: Admins can assign CPU cores, RAM, and I/O bandwidth per VM. Features like Dynamic Memory and NUMA-aware scheduling optimize performance.
» Don’t miss the best enterprise AI platforms for IT management or read more about How to back up Hyper-V machines.

Source: https://learn.microsoft.com/en-us/windows-server/virtualization/hyper-v/architecture
Best environments for Microsoft Hyper-V
Hyper-V excels across multiple deployment scenarios, from development labs to enterprise production environments, thanks to its flexibility and robust feature set:
- Testing and lab environments: Nested virtualization allows you to run different workloads inside the same environment, making it ideal for DevOps testing, software QA, and training scenarios without affecting production systems.
- Production workloads at scale: NUMA-aware scheduling and dynamic memory support ensure optimal performance for resource-intensive applications, while live migration enables zero-downtime maintenance and load balancing across hosts.
- Disaster recovery: Hyper-V Replica mirrors VMs between regions for on-premises failover, while Azure Site Recovery integration enables automatic cloud failover during outages. This ensures business continuity with minimal data loss.
- Hybrid cloud deployments: Seamless integration with Azure allows organizations to extend on-premises infrastructure to the cloud, enabling flexible resource scaling, centralized policy management through Azure Arc, and consistent management across environments.
For example, this might allow a finance firm to use Hyper-V’s virtual switch isolation to segment sensitive accounting VMs from general-purpose workloads, improving compliance and reducing lateral attack risk. A healthcare IT provider might use Hyper-V to separate the patient data workload from the general operation, making use of virtual switches and secure boot to easily achieve HIPAA compliance.
How to use Hyper-V effectively
Successfully deploying Hyper-V means understanding its capabilities and constraints before you try. While Hyper-V delivers enterprise-grade virtualization at no additional licensing cost, IT professionals need to navigate hardware compatibility requirements, performance considerations, and licensing nuances to avoid common pitfalls.
Challenges and limitations to anticipate
IT professionals deploying Hyper-V should anticipate challenges related to hardware compatibility, performance tuning, and licensing, especially in mixed environments or when scaling across clusters.
They include:
- Hardware compatibility: Older CPUs may not support SLAT (Second Level Address Translation), which is required for Hyper-V to function. This affects legacy systems manufactured before 2011 and some budget laptops that lack advanced virtualization features.
- Performance constraints: When running Hyper-V clusters with mixed processor types (AMD and Intel), enabling CPU compatibility mode ensures VMs can migrate between different hosts. However, this compatibility layer can reduce overall performance significantly, particularly in high-I/O workloads like database servers or file storage systems.
- Licensing complexity: Hyper-V’s licensing varies significantly by Windows edition. Standard edition allows two virtual machines per license, while Datacenter edition provides unlimited VM rights. It depends on the host OS licensing, and misalignment between editions can create compliance risks during audits. Make sure you carefully plan licensing based on your expected VM density to avoid unexpected costs.
- Security maintenance: Like all hypervisor platforms, Hyper-V requires proactive security patching. Vulnerabilities such as CVE-2024-49117 (which allowed guest VMs to escape to the host system) demonstrate the importance of timely updates and host-level isolation strategies. IT teams must monitor security bulletins and maintain regular patching schedules to protect against emerging threats.
With these specifications in mind, the hardware requirements for using Microsoft Hyper-V effectively are:
- 64-bit processor with Second Level Address Translation (SLAT)
- Hardware-assisted virtualization (Intel VT-x or AMD-V)
- Minimum 4 GB RAM, though 8 GB+ is recommended for stable VM performance
» Creating servers? Here are our picks for the best server racks
Step-by-step installation guide
Installing Hyper-V and managing virtual machines is straightforward with the right edition of Windows and hardware support. Below are the step-by-step guides for both installation and VM management, with curated visuals to enhance clarity.
On Windows 10/11 Pro, Enterprise, or Education
1. Open Control Panel

2. Navigate to Programs and Features > Turn Windows features on/off

3. Check Hyper-V, including Hyper-V Management Tools and Platform

4. Click OK
5. Restart your system
On Windows Server
Open Server Manager > Add Roles and Features
Select Hyper-V under Server Roles
Follow prompts > Restart server
How to create, configure, and manage a VM in Hyper-V
Once Hyper-V is installed, follow these steps:
1. Open Hyper-V Manager
2. Click your computer name from the left pane, then Actions > New > Virtual Machine

3. Use the wizard to set: Name & location, Generation (1 or 2), Memory allocation , Virtual switch , Virtual hard disk (VHDX), and OS installation media

4. Click Finish > Right-click VM > Start
5. Use Settings to adjust CPU, RAM, checkpoints, or enable Secure Boot
IT teams can then configure virtual networking in Hyper-V by creating internal, external, and private switches to control VM communication with each other and the outside world. Each switch type serves distinct business needs, from isolated testing to full production networking:
- External switch: Connects VMs to the physical network and internet. Ideal for production workloads.
- Internal switch: Allows communication between VMs and the host OS but blocks external access. Useful for DevOps or QA testing.
- Private switch: Isolates VM traffic from both host and external networks. Best for sandboxing or malware analysis.
To create a network switch, follow these steps:
1. Open Hyper-V Manager > Virtual Switch Manager

2. Choose switch type > Name it > Assign network adapter

3. Apply settings > Attach switch to VM via Settings > Network Adapter
» Learn more: How to choose the right network switch for your IT team
Essential tools and features to master
Key Hyper-V features, such as checkpoints, live migration, replication, and nested virtualization, empower IT teams to streamline operations, reduce downtime, and enhance testing flexibility, especially in MSP and enterprise environments.
They include:
- Checkpoints: Create point-in-time snapshots of VMs that capture the complete state including memory, disk, and configuration settings. Before applying patches, testing new software, or making system changes, technicians can create a checkpoint and instantly roll back if something goes wrong. Unlike traditional backups that can take hours to restore, checkpoint rollbacks happen in seconds.
- Live migration: Move running VMs from one Hyper-V host to another without any downtime or service interruption. The VM continues running while its memory state and storage transfer to the destination host, making the switch transparent to users. This is crucial for hardware maintenance (replacing failed components, upgrading servers), load balancing (moving VMs away from overloaded hosts), and energy optimization (consolidating VMs during off-peak hours to power down unused hosts).
- Replication: Hyper-V Replica continuously copies VMs to a secondary location (either another on-premises datacenter or Azure), providing asynchronous disaster recovery protection. Unlike backup systems that create periodic snapshots, replication maintains a near-real-time copy of your VMs. If the primary site experiences a disaster (power failure, natural disaster, hardware failure), you can quickly failover to the replica site with minimal data loss.
- Nested virtualization: Run Hyper-V inside a Hyper-V VM, enabling a complete virtualization environment within a virtual machine. This allows you to test Hyper-V configurations, cluster setups, and failover scenarios without requiring physical hardware. For example, DevOps teams might use nested virtualization to run Docker containers and Kubernetes clusters inside VMs for development and testing. Training environments benefit by giving each student a complete Hyper-V host they can experiment with safely.
For IT professionals managing diverse environments, PowerShell enables automated Hyper-V management across multiple hosts, dramatically reducing manual configuration time and ensuring consistency across environments.
Using tools like Atera’s RMM, you can even run these essential PowerShell scripts remotely across IT environments to deploy standardized VM configurations, monitor VM performance and trigger alerts, and automate patch management and updates.
For example, you can deploy the following PowerShell script to create a virtual machine with specific parameters:
The Script:
Atera does not guarantee the integrity, availability, security, virus-free, safety, lawfulness, non-infringement, rights’ status, or functionality of the scripts. The use of the shared scripts is at your own risk. Scripts are provided “AS IS”. *
New-VM -Name "WebServer01" -MemoryStartupBytes 4GB -Generation 2 -NewVHDPath "C:\VMs\WebServer01.vhdx" -NewVHDSizeBytes 60GB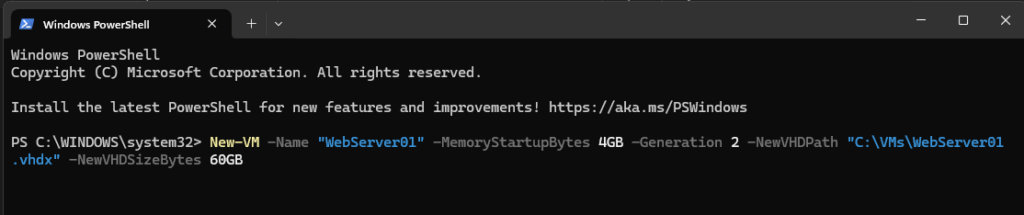
You can also get the status of virtual machines across multiple hosts with the following command:
The Script:
Atera does not guarantee the integrity, availability, security, virus-free, safety, lawfulness, non-infringement, rights’ status, or functionality of the scripts. The use of the shared scripts is at your own risk. Scripts are provided “AS IS”. *
$hosts = "HyperV-Host01", "HyperV-Host02", "HyperV-Host03" Invoke-Command -ComputerName $hosts -ScriptBlock { Get-VM | Select-Object Name, State, CPUUsage, MemoryAssigned }Or even configure new virtual switches with this command:
The Script:
Atera does not guarantee the integrity, availability, security, virus-free, safety, lawfulness, non-infringement, rights’ status, or functionality of the scripts. The use of the shared scripts is at your own risk. Scripts are provided “AS IS”. *
$switchConfig = @{ Name = "External-Switch" NetAdapterName = "Ethernet" AllowManagementOS = $true } New-VMSwitch @switchConfigTransform your virtualization strategy with the right tools
Microsoft Hyper-V delivers enterprise-grade virtualization with seamless Microsoft ecosystem integration, robust disaster recovery capabilities, and flexible management tools ranging from PowerShell automation to SCVMM orchestration. Whether you’re running production workloads, testing environments, or hybrid cloud deployments, Hyper-V provides the foundation for efficient, scalable IT operations.
But virtualization is just one piece of efficient IT management. While Hyper-V handles your virtual infrastructure, Atera’s Autonomous IT platform eliminates up to 40% of IT workload through AI agents that handle end-user requests, automate routine tasks, and provide intelligent assistance to your technicians, all while enabling them to remotely execute Hyper-V PowerShell commands and monitor system performance across your virtual infrastructure. With Robin resolving tier-1 issues autonomously and AI Copilot accelerating technician workflows, Atera complements your Hyper-V environment by transforming how your team manages the entire IT operation.
» Ready to try it out? Start a free trial with Atera
Frequently Asked Questions
Related Articles

What is IT Management
IT downtime costs thousands of dollars per minute, yet most companies don't realize they have a management problem until systems fail. Without structured IT management, you face productivity hemorrhage, security breaches from unpatched vulnerabilities, and technical debt that consumes IT budgets. Technology should be a business enabler, not a constant crisis.
Read now
What is infrastructure monitoring?
The difference between proactive IT and midnight firefighting comes down to visibility: seeing CPU saturation before it crashes services, catching disk failures before they lose data, and detecting anomalies hours before they become disasters. Effective infrastructure monitoring is the path that gets you there.
Read now
CapEx vs. OpEx
Misclassifying IT spending as CapEx or OpEx inflates profits short-term but distorts financial reporting, tax liability, and strategic decisions. Bad enough, this could be extremely costly and time-consuming to fix. Getting it right determines whether your IT investments align with cash flow, growth trajectory, and compliance requirements.
Read now
How to restart a remote computer using Windows
Remote Windows restarts fail when network connectivity drops, permissions aren't configured correctly, or firewall rules block critical services. This guide covers every method (from Command Prompt and PowerShell to enterprise tools like Intune and SCCM) plus backup strategies for when systems freeze or disconnect from the domain.
Read nowEndless IT possibilities
Boost your productivity with Atera’s intuitive, centralized all-in-one platform


