
Generate summary with AI

Windows Automatic Repair is meant to be a convenient way to resolve common boot issues like missing or corrupted files, disk or hardware errors, and driver updates and problems, saving you time and effort. But what do you do when there aren’t any issues to fix and your PC is still endlessly triggering Automatic Repair. Or maybe Malwarebytes found and fixed some malware on your PC, but not before it disabled Automatic Repair.
Luckily it’s an easy fix. This guide will show you the two main ways you can enable or disable Automatic Repair, depending on your needs.
» Trying to figure out why Automatic Repair got disabled? Check your Windows Activity History or run a PC diagnostics report
How Automatic Repair works in Windows 11
Windows 11 activates Automatic Repair when it detects ongoing startup failures (usually after two unsuccessful boot attempts), and the process runs automatically on the next restart. It may also be triggered by:
- Corrupted boot records
- Abrupt shutdowns
- Secure Boot issues
- BitLocker related errors
- Update failures
Unlike manual startup troubleshooting, which you access through the Windows Recovery Environment (WinRE), Automatic Repair initiates early in the boot sequence without user input. It performs diagnostic checks on boot configuration data, registry, and critical system files, then attempts to fix them automatically.
» Tired of updates? Here’s how disable Windows updates and re-enable automatic Windows updates
The Automatic Repair process
Automatic Repair operates at a low system level, interacting directly with key startup components. It first engages the Windows Boot Manager (bootmgr) and Boot Configuration Data (BCD) to detect corruption or misconfiguration preventing normal startup. When triggered, it serves as the first automated layer and attempts to fix startup issues before offering manual options.
If boot entries are intact, it moves on to run disk integrity checks using tools like chkdsk to identify and repair file system or disk errors that might block the OS from loading. Additionally, Automatic Repair leverages the Windows Recovery Environment (WinRE) stored in a recovery partition, which provides the isolated environment needed to perform diagnostics and repairs safely without booting the main OS. This allows it to restore boot files, rebuild the BCD, or initiate rollback operations automatically.
If Automatic Repair can’t resolve the issue, it redirects you to WinRE’s Advanced Options menu, where tools like System Restore, Reset this PC, or Safe Mode can be accessed manually. However, it may override manual recovery options temporarily when critical boot components (e.g., the Boot Configuration Data or system registry) are corrupted.
» Make sure you know the difference between autonomous and automated
Methods to enable or disable automatic repair in Windows 11
Command-line methods (the recommended approach)
Command-line methods are a preferred choice by many IT pros because they offer precision, scriptability, and the ability to deploy changes remotely across multiple endpoints. Unlike GUI-based approaches, command-line tools like <bcdedit> directly modify the Boot Configuration Data (BCD), ensuring changes are applied consistently and can be automated through PowerShell scripts.
Follow these steps:
1. If Windows boots normally, open an elevated command-line interface (either PowerShell or Command Prompt), by launching it as an admin from the Windows search box

2. Check the current automatic repair status by pasting the PowerShell command: <bcedit /enum {default}>

Tip: If you get an error message, try putting quotation marks around the {default} like the image above.
3. You’ll see a bunch of information show up if you entered the command right. Find the line that reads “recoveryenabled”, where it will either show yes (enabled) or no (disabled).

4. If you need to change the setting, just use the command <bcdedit /set {default} recoveryenabled No> to turn it off or <bcdedit /set {default} recoveryenabled Yes> to turn it back on

5. Restart your PC for the changes to take effect
One of the main advantages of PowerShell is that scripts can be executed remotely across multiple endpoints from a central location. For example, with Atera, you don’t need extensive IT experience to disable or enable Automatic Repair across your Windows fleet. AI Copilot can help you generate the script you need from simple natural language instructions that you can deploy to all your connected endpoints through the RMM platform and then monitor and manage in real-time how it affects each device.
» Learn more about running PowerShell commands on a remote computer
Editing the registry (the riskier approach)
Registry-based methods offer an alternative way to configure automatic repair settings in Windows 11, though they come with significantly higher risks compared to command-line approaches. While bcdedit includes built-in validation and automatically backs up Boot Configuration Data before making changes, direct registry edits bypass these safety mechanisms entirely.
This means a single typo or incorrect value can lead to boot failures, registry corruption, or loss of access to the Windows Recovery Environment. For these reasons, registry methods should only be used by advanced administrators in controlled testing environments and never on production systems.
Please note: There is no direct registry equivalent to the recoveryenabled setting in bcdedit. The Boot Configuration Data (BCD) is stored in a separate binary file (\Boot\BCD), not in the traditional Windows Registry. While you can influence some boot behaviors through registry keys in Session Manager, you can’t directly enable or disable Automatic Repair through the registry alone.
Follow these steps:
1. Open the Registry Editor by pressing Win + R, typing regedit, and pressing Enter. Click “Yes” when prompted by User Account Control.

2. Navigate to the Boot Configuration registry keys through the following path: HKEY_LOCAL_MACHINE\SYSTEM\CurrentControlSet\Control\Session Manager
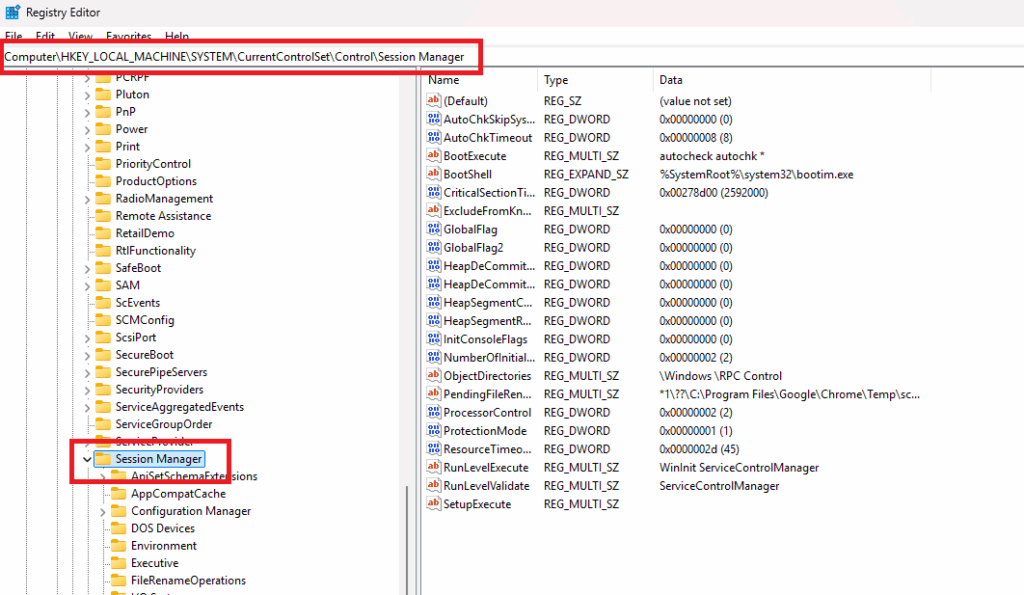
3. Before making any changes, back up the registry key by right clicking the Session Manager folder and selecting “Export”. Save the .reg file to a safe location so you can restore it if something goes wrong.

4. Look for or create DWORD values that influence boot behavior. In the right pane of the Session Manager key, you may find values like BootExecute (controls which programs run during boot) and AutoChkTimeout (affects disk check timeout behavior).

5. If you need to create a new value, simply right-click in the blank space and select New > DWORD (32-bit) Value

6. Modify values with extreme caution by double-clicking one of the DWORD files, but be warned that incorrect modifications can prevent Windows from booting properly.

7. Restart your PC for the changes to take effect, but be sure to monitor it so you know Windows is booting correctly.
» Something went wrong? Here are the most common registry editor challenges with solutions
Troubleshooting common Windows Automatic Repair problems
Before trying to figure out if there are any problems with Automatic Repair, start by checking if disabling it actually worked. After running the <bcedit /enum {default}> command in PowerShell, make sure the recoveryenabled line reads “No”.
If it does but you’re still experiencing IT issues, here are some specific causes and things you can do to fix them:
“The operation completed successfully” but setting didn’t change
You run the bcdedit command, see “The operation completed successfully,” but when you check with bcdedit, the recoveryenabled value hasn’t changed.
This could be because:
You’re checking the wrong boot entry
If you modified {default} but your system is actually booting from {current}, the change won’t apply to your active Windows installation.
Solution: Use the command <bcdedit /enum {all}> to see all boot entries, identify which one your system actually uses (look for the one marked as “current”), and target that specific identifier.
Insufficient permissions
Even if you’re running as Administrator, certain security software or system policies might block BCD modifications.
Solution: Temporarily disable antivirus or endpoint protection software, then retry the command. Re-enable protection immediately after.
» Learn more about software deployment
Boot loop after disabling Automatic Repair
Disabling Automatic Repair prevents Windows from attempting automated fixes when boot failures occur. If an underlying boot issue exists (corrupted BCD, damaged system files, driver conflicts), Windows will repeatedly fail to start without attempting recovery.
Solution: Force entry into WinRE by interrupting the boot process three times (hold the power button to force shutdown when you see the Windows logo, repeat three times). On the third restart, Windows will automatically boot into the Recovery Environment. Then follow these steps:
- From WinRE, open Command Prompt via Troubleshoot > Advanced Options > Command Prompt
- Re-enable Automatic Repair temporarily to diagnose the issue by running: <bcdedit /set “{default}” recoveryenabled Yes>
- Run these manual repair commands to fix the underlying boot problem:
- <bootrec /fixmbr>
- <bootrec /fixboot>
- <bootrec /rebuildbcd>
- <sfc /scannow /offbootdir=C:\ /offwindir=C:\Windows>
Restart and allow Automatic Repair to run.
Balance automated recovery with IT control
While Automatic Repair serves as a valuable safety net for end users, IT teams supporting enterprise environments need the flexibility to disable it temporarily for diagnostics, standardize configurations across fleets, or prevent repair loops on systems with known issues.
For IT enterprises managing multiple Windows 11 endpoints, centralized tools transform Automatic Repair configuration from a tedious, device-by-device task into a scalable policy. Atera’s all-in-one RMM platform enables IT teams to deploy bcdedit scripts remotely, monitor boot success rates across managed devices, and maintain audit logs of configuration changes all from a single dashboard. With Atera’s automation capabilities and centralized monitoring, you can ensure consistent Automatic Repair policies while maintaining the visibility needed to detect and address boot issues before they impact productivity.
» Interested? Start a free trial now
Related Articles

What is IT Management
IT downtime costs thousands of dollars per minute, yet most companies don't realize they have a management problem until systems fail. Without structured IT management, you face productivity hemorrhage, security breaches from unpatched vulnerabilities, and technical debt that consumes IT budgets. Technology should be a business enabler, not a constant crisis.
Read now
What is infrastructure monitoring?
The difference between proactive IT and midnight firefighting comes down to visibility: seeing CPU saturation before it crashes services, catching disk failures before they lose data, and detecting anomalies hours before they become disasters. Effective infrastructure monitoring is the path that gets you there.
Read now
CapEx vs. OpEx
Misclassifying IT spending as CapEx or OpEx inflates profits short-term but distorts financial reporting, tax liability, and strategic decisions. Bad enough, this could be extremely costly and time-consuming to fix. Getting it right determines whether your IT investments align with cash flow, growth trajectory, and compliance requirements.
Read now
How to restart a remote computer using Windows
Remote Windows restarts fail when network connectivity drops, permissions aren't configured correctly, or firewall rules block critical services. This guide covers every method (from Command Prompt and PowerShell to enterprise tools like Intune and SCCM) plus backup strategies for when systems freeze or disconnect from the domain.
Read nowEndless IT possibilities
Boost your productivity with Atera’s intuitive, centralized all-in-one platform


