
Table of contents
Table of contents
- What is BitLocker drive encryption?
- How does BitLocker work?
- What benefits are there to using BitLocker?
- What requirements will I need to use BitLocker?
- How to enable BitLocker for Windows 10
- How long will encrypting with BitLocker take?
- What if I want to decrypt using BitLocker?
- How to use BitLocker for enhanced data security
- Leverage BitLocker for enhanced data security
Generate summary with AI

So, how does BitLocker work? If you are wondering how to make the most of BitLocker and keep your data safe, then this article is for you.
Today we will walk you through how to use BitLocker, how it works behind the scenes, the OS requirements for BitLocker, and anything else that you may need to know about this tool.
What is BitLocker drive encryption?
Wondering which Windows features you can use for full-volume hard drive encryption? BitLocker is the tool you’re looking for! Microsoft BitLocker is a Windows-native security feature that encrypts everything on the drive on which Windows is installed. You can encrypt PCs or drives, and full-volume encryption ensures that only those with the correct encryption key will be able to decrypt the drive to access your files and information.
What is BitLocker used for? Great question! BitLocker drive encryption is used to mitigate the potential for unauthorized access of a computer’s operating system drive. By password-encrypting a computer’s operating system drive, you’re able to keep any files, images, or data of any kind secure and away from unwanted eyes.
We will dive deeper into the benefits of using BitLocker shortly, but the potential is clear. Using BitLocker for full-volume hard drive encryption allows users to protect sensitive data, helps companies and service providers remain compliant with data protection regulations, and offers peace of mind for all.
How does BitLocker work?
BitLocker utilizes a hardware element known as a TPM, or Trusted Platform Module. The program uses a symmetric encryption algorithm, often Advanced Encryption Standard (AES), to encrypt the entire drive. In doing so, it generates a Full Volume Encryption Key (FVEK) and a Volume Master Key (VMK), also known as the “recovery key.” To put it simply, the FVEK encrypts your data, and the VMK protects the FVEK.
After encrypting your hard drive with BitLocker, authentication will be required every time you start up your computer. You will need to entera specific pin number or password to gain access to your data and files. There will also be a recovery key (the VMK) that can be used if for any reason you forget the password. You should make sure to save this recovery key somewhere safe. Do not store your recovery key in the encrypted hard drive or on an easily hackable USB flash drive.

Authentication screen from BitLocker (Image via Microsoft Learn)
What benefits are there to using BitLocker?
The aim of BitLocker is to protect computers and drives against data breaches and intrusions. The main benefits of BitLocker are:
- It encrypts your entire drive, providing a high level of security using the TPM module
- You can set up BitLocker to automatically save keys to Active Directory
- As a native Windows Function, there are no additional licensing costs,
- BitLocker has a negligible impact on read performance and no impact on write performance
- BitLocker is easy to set up (keep reading for a step-by-step walkthrough on how to set up BitLocker on Windows 10!)
What requirements will I need to use BitLocker?
Not all computers or encrypted drives can use BitLocker. The program is currently supported on the following operating systems:
- Ultimate and Enterprise editions of Windows 7
- Pro and Enterprise editions of Windows 8 and 8.1
- Pro, Enterprise, and Education editions of Windows 10 and Windows 11
- Windows Server 2008 and later
In addition to using a device with one of the above operating systems, you need to be logged into the PC as an administrator, and you should have access to a printer so that you can print the recovery key. BitLocker is not available on Windows Home licenses. Additionally, Microsoft recommends using BitLocker on a device with a TPM (Trusted Platform Module) version 1.2 or higher.
How to enable BitLocker for Windows 10
Step 1: To enable BitLocker, you start by heading to the start menu search box, and search for “Manage BitLocker.” Click to open “Manage BitLocker” in the control panel. Note that BitLocker data protection is NOT available on Windows 10 Home edition.

Screenshot via Dell Support
Step 2: If BitLocker is available on your device, you will see a button that says “Turn on BitLocker.” Select this option. Next, you will be prompted with a few settings. Let’s go through them one by one..
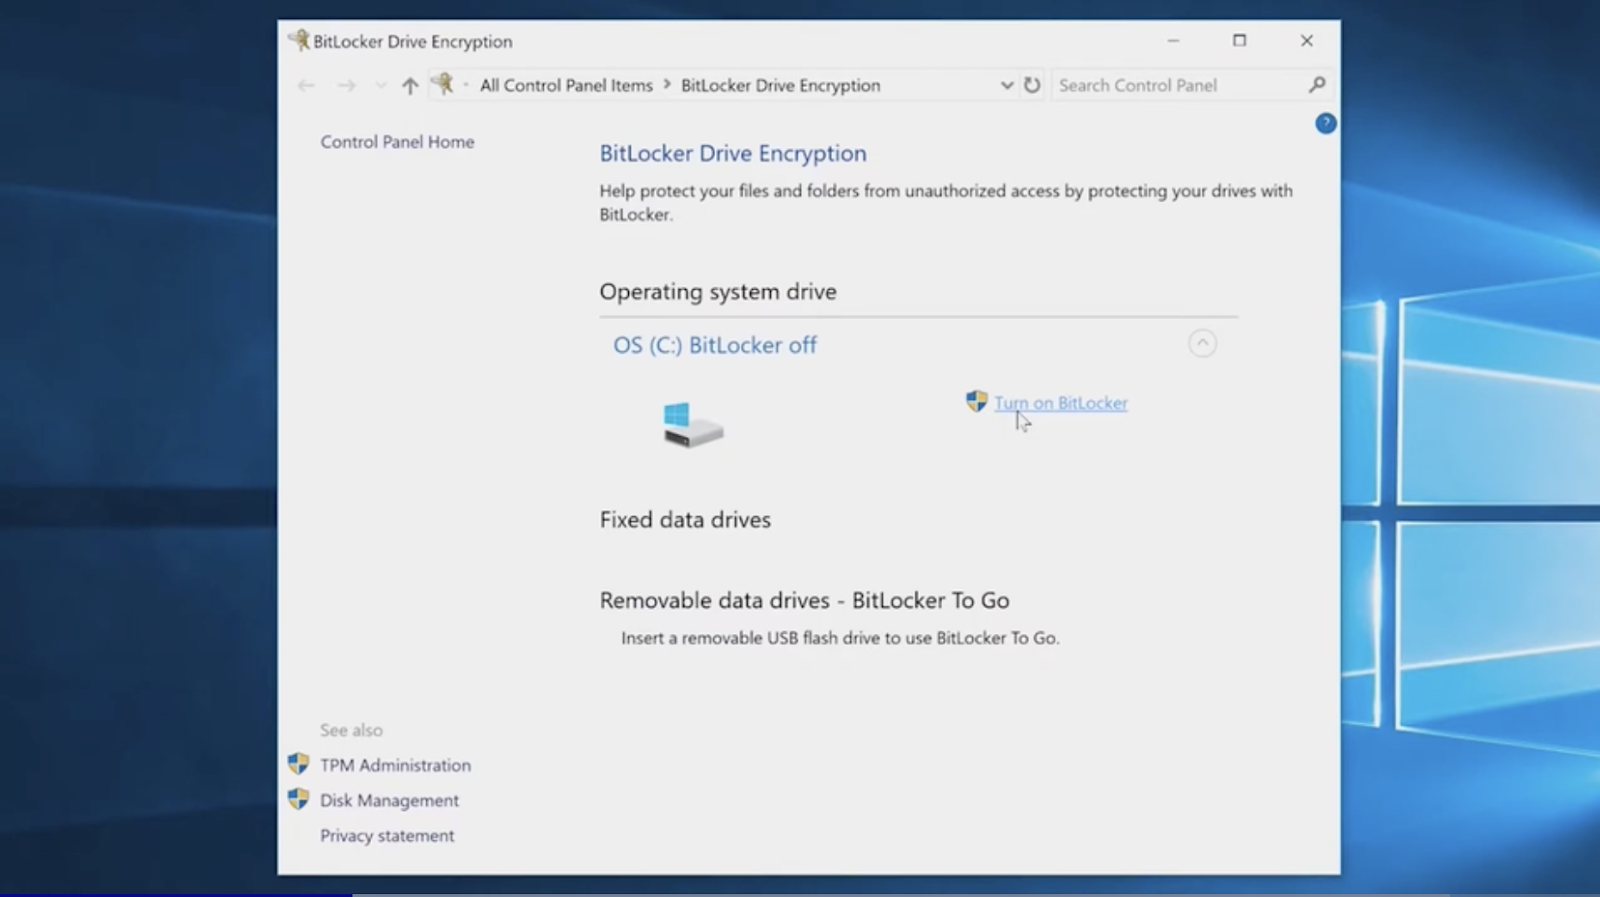
Screenshot via Dell Support
Step 3: Choose how to save your recovery key. You can save it to your cloud domain account, save it to a file, or print it. Once you pick the option that works best for you, click “Next” on the bottom right.

Screenshot via Dell Support
Step 4: Choose how much of your drive you would like to encrypt. You can choose to encrypt the portion of your drive that is already in use, or you can choose to encrypt the entire drive. The latter option will take longer but offers more robust security. Once you make your decision, click “Next” on the bottom right.
On Windows 10 build 1511 or newer, you’ll also be asked to choose the mode of encryption, which can be compatible, or new. Compatible is best for removable drives that will then be used with older versions of the Windows OS. For your storage drive, it’s likely that you will need to check ‘new’. Don’t forget to click the “Run BitLocker system check” button, which will ensure that Windows checks your system before the encryption begins.

Screenshot via Dell Support
Step 5: Run the BitLocker system check. Check the box next to this text to ensure that the system check runs. Then, click “Continue” in the bottom right corner.

Screenshot via Dell Support
First, Windows will check your system settings and configuration to make sure that you can use BitLocker. For example, if your TPM module is off, Windows will automatically turn this on for you. You may need to restart your computer one or more times, so make sure that any open work is completed and/or saved.
Before encryption begins, you will be asked to choose a password and a recovery password. Your password will need to be used every time you access your PC or drive, even before the operating system starts up. You can choose to enter this manually or via a USB flash drive.
You’ll now need to manually restart your computer and enter the password for the first time. At this point, you’ll be asked if you’re ready to encrypt. Simply click “Confirm.”
How long will encrypting with BitLocker take?
The time it takes to encrypt your device with BitLocker can vary depending on how much data there is to encrypt, and also on how intensive the work that you complete is while the encryption process is taking place. On new computers, it may take as little as 20 minutes, while it can take 2 or 3 hours to complete at the other end of the scale. If you’re in a hurry, try to not use the device while encryption is taking place, or consider whether choosing “used disk space only” is correct for your security needs.
What if I want to decrypt using BitLocker?
If you decide that you would no longer like to use BitLocker to encrypt your data, you can head back to the “Manage BitLocker” settings in the control panel, and you’ll see the same button available to turn off BitLocker. You can confirm your decision through the OS prompts, and the system will automatically begin decrypting.

Screenshot via Dell Support
How to use BitLocker for enhanced data security
In today’s digital landscape, protecting sensitive information is crucial, and BitLocker provides a robust solution for encrypting your data. BitLocker, a built-in encryption feature of Windows, helps safeguard your data from unauthorized access by encrypting the entire disk. Other best practices for maintaining security include remote monitoring and management and patch management.
Getting started with BitLocker
Check system requirements: Before enabling BitLocker, ensure your system meets the hardware and software requirements. BitLocker requires a Trusted Platform Module (TPM) version 1.2 or higher.
Enable BitLocker:
- Open the Control Panel and navigate to “System and Security” and then “BitLocker Drive Encryption.”
- Select the drive you want to encrypt and click “Turn on BitLocker.”
- Follow the prompts to configure your encryption settings and choose how you want to unlock your drive (e.g., with a password or a USB drive).
Explore how to turn on BitLocker on Windows 10 in our detailed walkthrough above.
Backup your recovery key: During the setup process, BitLocker will prompt you to save a recovery key. It’s crucial to back up this key in a secure location, as it will be needed if you ever need to recover your drive.
Best practices for managing BitLocker
Utilize remote monitoring and management (RMM): For organizations, remote monitoring and management tools can greatly enhance the management of devices encrypted with BitLocker. RMM platforms allow IT administrators to monitor the encryption status of multiple devices from a centralized location. This ensures that all devices are consistently protected and helps quickly address any issues that may arise with encryption.
Implement patch management: Regular patch management is vital to ensure that your system remains secure. Applying the latest updates and patches can prevent vulnerabilities that could potentially undermine BitLocker’s encryption. Ensure that your patch management processes are up-to-date to maintain compatibility with BitLocker and protect your encrypted data from emerging threats.
Monitoring and maintenance
Regularly check encryption status: Use your RMM tools to periodically verify that all devices are properly encrypted and that there are no issues with BitLocker settings.
Update your system: Keep your operating system and all related software up-to-date with the latest patches. This practice not only protects against vulnerabilities but also ensures that BitLocker remains effective in safeguarding your data.
Leverage BitLocker for enhanced data security
BitLocker is a powerful tool for protecting your data, but its effectiveness is enhanced when combined with proactive management strategies. By integrating remote monitoring and management and patch management into your IT practices, you can ensure that your encrypted devices are continuously monitored, up-to-date, and secure against potential threats. Adopting these practices will help you maintain robust data security and operational efficiency.Want to explore the best data security, RMM, and patch management tools on the market today? Check out Atera, where we are changing the way you do IT. Our comprehensive suite of IT management tools is supported by extensive AI capabilities, meaning that you can work smarter, not harder. See the power of Atera for yourself. Take us for a test drive with our 30-day free trial, no credit card required.
Related Articles

Best API security tools in 2026: Protect against sophisticated threats
Managing secrets like API keys and credentials is essential for IT security. This article breaks down best practices, tools, and strategies to safeguard sensitive data. Learn how to simplify operations without compromising protection.
Read now
2026’s Best Secrets Management Tools: Buyer’s Guide for IT
Secrets management is critical to keeping your systems secure and your credentials protected. This guide explores top tools, best practices, and how IT teams can avoid breaches caused by poor secret handling. Discover how to streamline access control while maintaining airtight security.
Read now
What is secrets management? Best practices for IT security
Discover best practices for secrets management and why it's crucial for safeguarding sensitive information like passwords.
Read now
Zero Trust and non-human identity security
Discover how Zero Trust enhances security for both human and non-human identities. Learn how to protect service accounts, IoT devices, and automated systems with identity-based access controls and continuous verification.
Read nowEndless IT possibilities
Boost your productivity with Atera’s intuitive, centralized all-in-one platform


