
Generate summary with AI

You know that sinking feeling when a user calls saying their laptop won’t boot and is demanding a 48-character BitLocker recovery key they definitely don’t have written down anywhere? That’s usually a TPM detection failure at work. The Trusted Platform Module is supposed to be the invisible security backbone of modern Windows devices, quietly managing encryption keys and authentication credentials. When it suddenly goes missing, everything that depends on it grinds to a halt.
According to Microsoft, TPM-related issues are one of the reasons Windows 11 deployments fail pre-flight checks and won’t upgrade. The frustrating part is that most TPM detection errors have nothing to do with broken hardware. A disabled firmware setting, a driver hiccup, or a botched BIOS update can make a perfectly functional TPM vanish from Windows, leading to the “TPM device not detected” error.
Here’s what you can do to figure out what’s causing the problem and all the steps you can take to fix it.
Why TPM detection errors disrupt your IT operations
When a TPM suddenly becomes undetectable, the security features that depend on it fail immediately and your help desk knows about it within minutes.
Here’s what breaks:
- BitLocker stops working: Systems protected by BitLocker typically won’t boot and ask for recovery keys at startup, according to Microsoft. This happens because BitLocker relies on the TPM to verify that the system hasn’t been tampered with. No TPM visibility means no automatic unlock, and users are stuck at a blue recovery screen before Windows even loads.
- Authentication falls apart: Windows Hello for Business stops accepting biometric or PIN sign-ins because the private keys tied to those credentials are stored in the TPM. Certificate-based authentication for VPNs, wireless networks, and enterprise applications fails for the same reason, which means users can’t sign in, can’t connect to corporate resources, and can’t work.
- Security features degrade or disable: Credential Guard and other virtualization-based security features either fall back to less secure modes or shut down entirely because they require TPM. These protections depend on the TPM as their hardware root of trust to seal secrets and measure system integrity. Without TPM access, Windows can’t guarantee the security boundaries these features require.
- The operational impact compounds fast: One user with a TPM issue is an inconvenience. Twenty users who can’t boot after a firmware update is a crisis. TPM-related failures create immediate productivity loss because affected devices often can’t boot or authenticate until the issue is resolved.
Step-by-step guide to diagnosing, fixing, and preventing TPM detection issues
The good news about TPM detection failures is that they follow a predictable troubleshooting path: firmware first, then OS-level drivers and services, then hardware as a last resort. Most issues can be fixed at the firmware or Windows layer, which means you can handle them remotely without touching the physical device.
Here’s what that diagnostic and remediation workflow looks like:
Step 1: Back up the system
WARNING: Clearing or resetting the TPM (accidentally or intentionally) erases all stored keys permanently. Windows Hello credentials, BitLocker protectors, and certificate private keys will be lost. This action can’t be undone, so you should always backup first.
Make sure you do the following:
- Back up BitLocker recovery keys to a safe location. Azure AD, Active Directory, and handwritten notes or secure file storage if it’s a private machine. If you’re managing devices through Intune or another MDM, confirm recovery keys are synced.
- Export any certificates whose private keys are stored in the TPM, especially if you use certificate-based VPN or wireless authentication.
- Document your current state by running “Get-Tpm” in PowerShell and saving the output so you know what “working” looked like.

- Verify you have local administrator rights on the device. Most TPM management requires elevated permissions.

For IT teams managing multiple devices, Atera’s RMM platform enables you to track TPM firmware versions and status across your fleet through PowerShell scripts, establishing baselines before making changes.
Step 2: Perform a quick diagnosis to identify your TPM type
Before you can fix TPM detection, you need to know what type of TPM your system uses since this determines which troubleshooting path you’ll follow.
Modern systems use one of three TPM implementations:
- Discrete TPM (a physical chip soldered to the motherboard)
- Intel PTT (Platform Trust Technology, a firmware-based TPM built into Intel chipsets)
- AMD fTPM (AMD’s equivalent for firmware TPM)
The distinction matters because discrete TPMs fail due to hardware or connector issues, while firmware TPMs typically have problems with BIOS settings or chipset drivers.
Follow these steps:
1. Press Windows + R, type tpm.msc, and press Enter

2. If the TPM Management console opens and shows

3. The Manufacturer field confirms which type you have look for vendor names (Infineon, Nuvoton, STMicroelectronics) for discrete TPMs, or “INTC” for Intel PTT and “AMD” for fTPM
4. If tpm.msc shows the TPM but reports it’s not ready, you may need to initialize it
5. Look for an option to “Prepare the TPM” or run “Initialize-Tpm” in PowerShell (as an admin)

6. This process typically requires a reboot and may prompt for physical confirmation in firmware
7. To be sure, check Device Manager by pressing Windows + X and clicking on Device Manager

8. Expand Security devices and look for “Trusted Platform Module 2.0” or similar. If it’s missing or shows an error icon, continue to the firmware and OS-level fixes below

Step 3: Fix TPM detection in firmware/BIOS
Most TPM detection failures start in firmware, where the TPM can be disabled, hidden, or blocked by incompatible boot modes.
Follow these steps:
1. Reboot and enter UEFI/BIOS by mashing the vendor key during boot (usually F2, Del, Esc, or F10)
2. You should see the motherboard BIOS screen that looks something like the image below (but varies per manufacturer). If you get to the Windows login screen, you went too far and need to try again

3. Navigate to security settings, which could be labeled Security, Advanced, Platform Security, or Trusted Computing depending on the manufacturer. In our case, it was in the Settings > Miscellaneous section

4. Locate the TPM setting, typically labeled one of the following: TPM Device, Trusted Platform Module, TPM State, Intel Platform Trust Technology (Intel PTT), AMD ASP fTPM, or AMD PSP fTPM (or similar)
5. Change the setting to Enabled/Activated/Available

6. Navigate to Boot settings and confirm that Boot Mode is set to UEFI instead of Legacy or CSM. Modern systems might use UEFI by default, in which case you’ll just need to disable CSM support

7. Save changes and exit
8. Confirm in Windows by using tpm.msc or Device Manager
If no TPM menu exists in your firmware, your motherboard may not have TPM hardware or your firmware version predates TPM support for your CPU/chipset. Check your motherboard manual or manufacturer’s website to confirm TPM capability. If TPM should be present, download and install the latest BIOS/UEFI firmware from your vendor and try again.
WARNING: Updating your firmware can be tricky and interrupted BIOS updates can brick your system. To make sure you know what you’re doing, read our guides to firmware updates and BIOS updates.
Step 4: Fix TPM detection in Windows
When a TPM appears in firmware but Windows doesn’t recognize it, the problem is usually at the driver, service, or OS integration layer. There are a few things you’ll need to do to fix this issue from the OS:
Verify and update TPM drivers
1. Open Device Manager
2. Expand Security devices and look for “Trusted Platform Module 2.0” or a similar entry
If the TPM entry is completely missing from Device Manager, the device isn’t being detected by Windows at all. Confirm firmware settings again, then proceed to service checks
3. If the TPM entry has a yellow warning icon, right-click the TPM device > Update driver > “Search automatically for drivers”

4. Windows will attempt to install the correct driver from Windows Update
If driver updates don’t resolve the issue, visit your system manufacturer’s website and download the latest chipset drivers and platform security drivers. For Intel systems, this may include Management Engine drivers. For AMD systems, install the latest chipset drivers FOR YOUR CHIPSET that include PSP/fTPM support.
You can find your exact chipset by pressing Windows + R, typing “msinfo32”, and hitting Enter, then finding “BaseBoard Product” or “System Model”. In our case below, it’s the Gigabyte X870 EAGLE WIFI7.
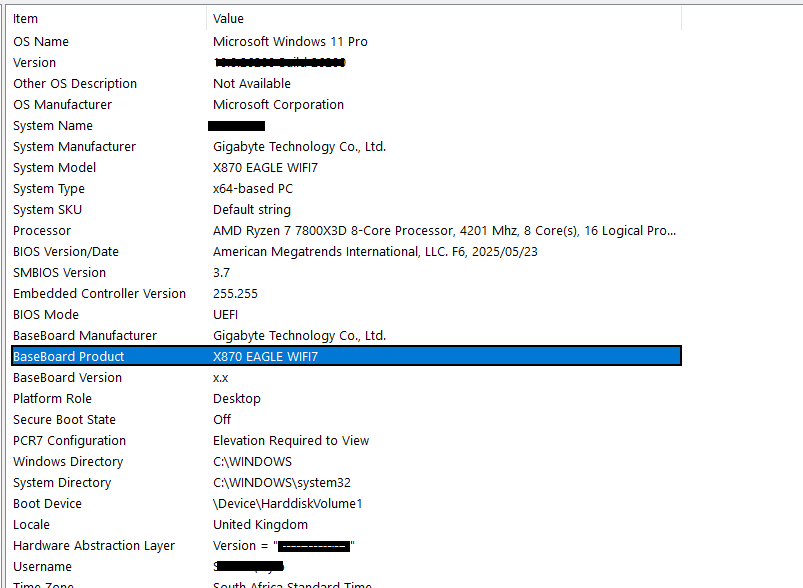
Since the product is an AMD product, we’d navigate to the AMD Drivers and Support page and find our exact chipset (the X870 product line) to download and install.

» Don’t miss our guide to updating drivers or skip directly to the best driver updater software
Check Event Viewer for TPM errors
1. Open Event Viewer (Windows + X, Event Viewer)
2. Navigate to Applications and Services Logs > Microsoft > Windows > TPM-WMI
3. If you don’t have the folder, then navigate to Windows Logs > Services > Filter Current Log, and add Event sources for TPM and TPM-WMI

4. Look for recent errors that indicate failed initialization, driver problems, or firmware communication failues
Common error codes include:
- Event ID 14: A TPM device driver error recorded in the System log when the TPM driver experiences an unrecoverable error.
- Event ID 15: The device driver for the Trusted Platform Module (TPM) encountered a non‑recoverable error in the TPM hardware, which prevents TPM services (such as data encryption) from being used.
- Event ID 17: A TPM event that records failed TPM commands along with response codes.
- Event ID 1796: When an unexpected error is encountered during a Secure Boot database update, with the message “The Secure Boot update failed to update a Secure Boot variable with error …”.
Note: Working TPMs typically don’t generate logs, so the absence of logs doesn’t necessarily mean there’s a problem.
» Need help? Here’s our guide to viewing and analyzing logs with Event Viewer
Roll back recent Windows updates
Occasionally, Windows Updates interfere with TPM detection. If the TPM disappeared immediately after a Windows update:
1. Go to Settings > Windows Update > Update history > Uninstall updates

2. Remove the most recent quality or feature update
3. Reboot and test TPM detection
4. Once working, reinstall the update or wait for a fixed version
» Here’s how to disable Windows updates and manually re-enable Windows updates
Step 5: Clear or reset the TPM (last resort before hardware replacement)
WARNING: Clearing the TPM should be treated as a last resort because it permanently erases all keys, including BitLocker protectors, Windows Hello credentials, and certificate private keys. It only makes sense to do this if:
- TPM is in a corrupted or failed state that initialization can’t fix
- You’re repurposing a device and need to completely reset security
- TPM ownership is stuck and preventing proper operation
Only proceed if you’ve exhausted other options and have backed up all recovery keys and certificates.
Follow these steps:
1. Backup everything first: BitLocker recovery keys, certificate exports, any credential data
2. Open tpm.msc (Windows + R, type tpm.msc, hit Enter)
3. In the Actions pane, click Clear TPM

4. Confirm the warning dialog (Windows will emphasize data loss)
5. System will reboot into firmware for physical confirmation
6. At the firmware prompt, confirm you want to clear the TPM (usually by pressing a specific key)
7. System completes the reboot and TPM is cleared
» Here’s how to restart a remote computer using Windows
Step 6: Check or replace hardware
If firmware and OS-level fixes don’t restore TPM detection, you may have a hardware failure. While this is less common than configuration issues, it could still be the problem.
Here’s what you should do in this case:
- Inspect your device for discrete TPM modules: Older systems with discrete TPM chips sometimes have connection issues. Power down completely, disconnect all power sources (including laptop batteries if removable), and open the case. Locate the TPM module (it’s usually a small rectangular chip on a dedicated header near the CPU or chipset). Verify it’s fully seated in its socket and reseat if necessary, then power up and test.
- Check for physical damage: Look for burn marks, corrosion, or obvious damage on the TPM chip or motherboard area around it. If present, the TPM or motherboard likely needs replacement.
- For firmware TPMs (Intel PTT/AMD fTPM): These are integrated into the chipset, so you wouldn’t be able to check it directly, but unstable power delivery or failing motherboard components can still affect the functionality. Run vendor hardware diagnostics to rule out broader motherboard issues.
If all of these points are true, you likely need a hardware replacement:
- Firmware diagnostics cannot detect the TPM
- Latest BIOS/UEFI firmware is installed
- No physical connection issues found (for discrete TPMs)
- Event Viewer shows persistent hardware communication failures
For discrete TPMs, you might be able to get a specific module directly from the manufacturer. For firmware TPMs integrated into the chipset, you’ll need to replace the whole motherboard, which can be extremely pricey unless the device is under warranty.
» Not sure? Here’s how to check your motherboard make and model
Manage TPM issues proactively instead of reactively
TPM detection failures are fixable, but the real goal is preventing them from happening in the first place. That requires visibility across your entire infrastructure, which means knowing which devices are running outdated firmware, which ones have TPM disabled, and which ones are about to fail compliance checks before users notice.
Atera’s Agentic AI platform provides the infrastructure for comprehensive TPM management across small and enterprise IT environments. Use AI Copilot to generate PowerShell scripts that check TPM status with simple natural language instructions, then deploy those scripts remotely across your fleet via the RMM platform. Run software deployment and updates during maintenance windows through centralized patch management, and troubleshoot IT issues remotely with PowerShell execution and integrated remote access that eliminates desk-side visits.
For IT teams managing modern Windows environments where TPM underpins security and compliance, Atera transforms TPM management from reactive firefighting to proactive infrastructure control.
» Interested? Start a free trial with Atera
Related Articles
How to check if a disk is MBR or GPT in Windows
Choosing between MBR and GPT depends on your hardware and future storage needs, with GPT supporting larger drives and modern security features. You can check your disk’s partition style in seconds using Disk Management, Command Prompt, or PowerShell.
Read now
How to enable or disable the Action Center in Windows 10 and 11
The Action Center centralizes system alerts and quick toggles, but it requires specific background services and shell integrations to function correctly. While hiding the interface stops visual distractions, notifications still process in the background, making proactive management necessary for security.
Read now
How to change file associations in Windows 10 and 11
Windows file associations follow a priority system that decides which app opens your files, and problems usually happen when those links break or apps aren’t registered correctly. You can fix or change them using built-in tools, while automation platforms make large-scale management much easier.
Read now
How to fix the “vcruntime140.dll not found” error in Windows 11
The "vcruntime140.dll" error usually happens because of missing or corrupt Visual C++ Redistributables. To fix it safely, verify your system architecture and reinstall the official Microsoft packages for both x86 and x64.
Read nowEndless IT possibilities
Boost your productivity with Atera’s intuitive, centralized all-in-one platform


