
Generate summary with AI

If the higher-ups at your company have finally listened to you and decided to upgrade everyone’s workstations to Windows 11, then you’ve probably learned that you need to have Secure Boot enabled or the installation will fail. Or maybe you just want to double check that it’s still enabled after you dealt with a malware attack (especially a bootkit or rootkit infection).
In any case, there are a few methods available to you with varying levels of ease and success, from simple GUI methods to advanced scripting and BIOS checks. Here’s everything you need to know.
Why Secure Boot verification matters and the challenges IT teams face
Secure Boot isn’t just another checkbox in your BIOS settings. It’s the foundation of Windows 11’s security model and a critical defense against boot-level attacks that can compromise entire systems before your OS even loads.
Many IT teams assume their hardware supports Secure Boot simply because it’s relatively recent. Most devices are capable of the Windows 11 requirements, including Secure Boot and TPM 2.0, but just because it’s supported, doesn’t mean it’s enabled. A device can have all the right components (UEFI firmware, TPM 2.0, manufacturer-signed bootloaders) and still boot insecurely if any single element is misconfigured.
When the prerequisites aren’t met
Secure Boot only functions when your entire boot chain is properly configured. The system needs:
- UEFI mode enabled (not legacy BIOS)
- An active TPM 2.0 chip
- Digitally signed firmware from your manufacturer
- Valid trusted keys (PK, KEK, DB, and DBX) loaded into firmware
Miss any one of these requirements, and your system may boot in insecure mode, leaving it vulnerable to rootkits that load before Windows can detect them. This blocks Windows 11 installation entirely, and compliance frameworks that require Secure Boot for endpoints suddenly flag your entire fleet as non-compliant.
According to Microsoft Learn, Secure Boot is foundational to Trusted Boot and required for modern enterprise IT environments. Without it, you’re operating with 20th-century boot security in a world of sophisticated firmware-level threats.
» Here’s how to automate threat detection & response
Why Secure Boot fails despite compatible hardware
Here’s the frustrating part: your hardware can be perfectly capable of Secure Boot, yet still fail to use it. IT teams often discover this during Windows 11 migrations when devices that should pass validation suddenly don’t.
For example, Dell PowerEdge servers have been known to show “Secure Boot disabled” in attestation logs despite TPM 2.0 being present and active.
Here are the most common reasons it might be failing:
- Legacy BIOS settings that were never converted to UEFI mode, even on newer hardware
- Your imaging tools may be silently overwriting UEFI settings during deployment, resetting Secure Boot to disabled with each reimage
- Firmware updates from your manufacturer sometimes reset BIOS defaults, turning off Secure Boot without warning
- Missing or corrupted security keys in firmware (the PK, KEK, DB, and DBX certificates) can prevent Secure Boot from activating even when explicitly enabled
Methods to confirm that Secure Boot is enabled in Windows
Once you understand why Secure Boot verification matters, the next step is actually checking its status. You have a few different options.
1. Locally with GUI methods
There are two main ways you can do this in system settings, which offer an easy GUI approach. The first is directly through system settings, following these steps:
1. Go to Settings > Privacy & security > Windows security

2. Click on Device security
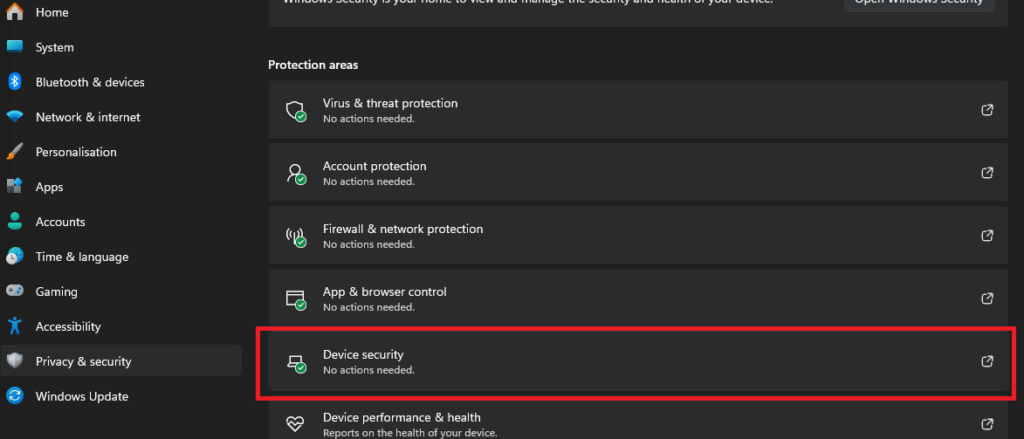
3. Look for the “Security processor” settings. You should see an option that says “Secure boot” with a green checkmark. If it’s not there or displays a warning icon, secure boot might be disabled.

WARNING: In many cases (like ours above), this method won’t work that well. It might show “Standard hardware security not supported”, in which case you’ll have to move onto the next local method, which is checking msinfo.
Follow these steps:
1. Press Windows key + R, then type “msinfo32” and hit Enter

2. Search for the line that says “Secure Boot State”. It’ll either say “On” or “Off”.

Note: Even if Secure Boot is enabled, there are some situations where msinfo will still display that it’s not (like in our example above). This is more likely in custom PC builds, and could be due to one of these reasons:
- Motherboard BIOS defaults: Many motherboards ship with Secure Boot disabled by default, even when UEFI mode and TPM are active. Windows 11 installation checks for compatibility with Secure Boot but doesn’t always enforce that it’s actively enabled during setup.
- BIOS settings reset: If you cleared CMOS, updated BIOS firmware, or reset to factory defaults during your build or troubleshooting, Secure Boot likely reverted to disabled.
Thankfully, these aren’t the only ways to check if Secure Boot is enabled.
2. With PowerShell
PowerShell and Command Prompt can confirm Secure Boot status using built-in commands. It’s often more trustworthy than the standard GUI methods and can provide more detailed information about the status of Secure Boot just by pasting a script.
Follow these steps:
1. Open PowerShell as an administrator

2. Run this command: Confirm-SecureBootUEFI

It’ll return one of these values:
- True: Secure boot is enabled.
- False: Secure boot is disabled.
- Error: Unsupported platform or insufficient privileges.
For IT teams managing multiple endpoints, manually running PowerShell commands on each device isn’t practical. Atera’s RMM platform lets you execute PowerShell scripts remotely across your entire fleet from a single console. Deploy the <Confirm-SecureBootUEFI> command as a scheduled script, collect results centrally, and identify non-compliant devices automatically.
3. Through the UEFI firmware (and how to enable/disable it)
Checking Secure Boot status directly in your BIOS/UEFI firmware is the most definitive method. This bypasses any Windows-level confusion or cached data and shows you exactly what your system firmware sees. You’ll want to use this approach when Windows tools show conflicting information, when you’re troubleshooting a custom-built PC, or when you need to actually enable or disable Secure Boot.
The firmware check is also essential before making deployment decisions since you can verify settings during initial hardware setup rather than discovering problems after imaging.
Step 1: Access your BIOS/UEFI settings
Restart your computer and mash the manufacturer-specific key during boot (before Windows loads), which is usually one of the following:
- Dell: F2 or Delete
- HP: Esc, then F10
- Lenovo: F1 or F2
- ASUS: F2 or Delete
- MSI: Delete
- Gigabyte: Delete or F2
If you boot to your OS login, you messed it up and need to try again. You should see your motherboard screen instead.

Step 2: Locate the Secure Boot setting
BIOS menus vary by manufacturer, but Secure Boot is usually found under one of these tabs:
- Boot (most common)
- Security
- Authentication
- Advanced > Boot Configuration
Navigate using your arrow keys or mouse (if it allows) and look for “Secure Boot” or “Secure Boot Configuration.”

Step 3: Check the current status
Once you find Secure Boot, it will show as either:
- Enabled: Secure Boot is active.
- Disabled: Secure Boot is turned off.
WARNING: If Secure Boot is disabled and you want to enable it, first make sure you disable BitLocker by running this PowerShell command: <Manage-bde -Protectors -Disable C:>. If you don’t, then BitLocker might activate and lock you out of the PC. At the very least, make sure you have your Bitlocker recovery key available.
Then, select the Secure Boot option and change it to Enabled. You may see additional related settings:
- Secure Boot Mode: Set to “Standard” or “Custom” (Standard is recommended).
- OS Type: Set to “Windows UEFI mode” or “UEFI OS”.

On some systems (particularly HP or Lenovo), you may need to disable Legacy Boot or CSM (Compatibility Support Module) first before Secure Boot becomes available.
Tip: If Secure Boot won’t activate, look for an option to “Restore Factory Keys” or “Install Default Secure Boot Keys”. This loads the necessary security certificates
Step 4: Save and exit
Press F10 (or the key shown on screen) to save changes and exit. Your system will restart with the new settings.

Keeping your endpoints secure starts with visibility
Whether you’re validating a custom-built PC through BIOS settings, scripting verification across a fleet with PowerShell, or troubleshooting why Windows Security shows conflicting information, having multiple verification methods for checking Secure Boot status ensures you catch configuration gaps before they become security risks.
For IT teams managing dozens or hundreds of endpoints, Atera’s agentic AI platform turns individual verification tasks into automated workflows. Generate powerful scripts with AI Copilot to check Secure Boot status on different endpoints and operating systems, then execute those scripts remotely across your entire fleet through the RMM platform, set up automation profiles to monitor Secure Boot status continuously, and get centralized visibility into which devices need attention.
» Take control of your visibility with an Atera free trial
Related Articles

How to check if a disk is MBR or GPT in Windows
Choosing between MBR and GPT depends on your hardware and future storage needs, with GPT supporting larger drives and modern security features. You can check your disk’s partition style in seconds using Disk Management, Command Prompt, or PowerShell.
Read now
How to enable or disable the Action Center in Windows 10 and 11
The Action Center centralizes system alerts and quick toggles, but it requires specific background services and shell integrations to function correctly. While hiding the interface stops visual distractions, notifications still process in the background, making proactive management necessary for security.
Read now
How to change file associations in Windows 10 and 11
Windows file associations follow a priority system that decides which app opens your files, and problems usually happen when those links break or apps aren’t registered correctly. You can fix or change them using built-in tools, while automation platforms make large-scale management much easier.
Read now
How to fix the “vcruntime140.dll not found” error in Windows 11
The "vcruntime140.dll" error usually happens because of missing or corrupt Visual C++ Redistributables. To fix it safely, verify your system architecture and reinstall the official Microsoft packages for both x86 and x64.
Read nowEndless IT possibilities
Boost your productivity with Atera’s intuitive, centralized all-in-one platform


